#Vanlife in any Vehicle on a Budget

Perhaps no trend in the outdoor community has come on stronger in the last few years than van life. You see it everywhere. Online on Instagram, blogs, and Youtube. Out in the world in National Parks, mountain towns, and highways everywhere. Along with the trend, as with any, comes all of the gear. If you want to build out a van, there are infinite ways to do so. This article, the second in our Inside the Gear Closet series, is not about that. I do not own a van and thus have no way to offer you my van build and gear. However, the van life trend recently finally inspired me to make the most of my 2002 Toyota Rav4 and convert it into a car camper.
It was a fun project to figure out how to best use the space (or lack thereof) in my little car and turn it into a vehicle that I can easily take camping anywhere. I couldn't live out of this car as the vanlifers do, but I'm excited to be able to hang with them now. In this article, I'll take you through my little build and some of the gear I made use of for a great car camping experience recently!
Motivation
This was something I've wanted to do for a while. I've actually been driving this car for 10 years - since I was 16. Though at first, it was merely a means of transportation, over time, I grew closer to the vehicle as many people do. As I got more into exploring the outdoors, hiking and cycling, the idea of turning my vehicle into one that could accommodate those adventures as best as possible came into my head.
Still, having an idea is only half the battle. Maybe not even that. We get busy. Work, family, friends, and other projects always seemed to butt their way onto my to-do list ahead of this. The motivation wanes quickly. Many projects and ideas for all of us seem to fall into the corners of our drawers forever.

My ol’ 2002 Toyota Rav4
I think that when we get stuck like this, whether it's on building a bed in our car, planning a big hike we've always wanted to go on - anything, it's important not to beat ourselves up. It's entirely human to struggle to find motivation even for something that you're really excited about. When we use that struggle to make ourselves wrong, it only perpetuates a negative cycle. Ultimately this is what takes dreams of ours from the "maybe one-day" drawer to the "never going to happen" drawer.
Building out the car stayed in my "maybe one-day" drawer for a while. The circumstances of my life were never right for it. But I didn't give up on it; I left it there, I didn't get down on myself for not having done it yet. Then, my life's circumstances took some changes. All of a sudden, I found myself perfectly willing and able to do it. All it took was starting on step one to get me going. From there, I just didn't stop until it was finished.
Getting Prepped
OK, so on to what I actually did to turn my ordinary, small SUV into a camper car! The biggest key to this was maximizing the space. It isn't a huge vehicle, and if I was going to build out a bed, I needed to not only make sure I could sleep comfortably in it but make sure I could also store as much stuff as possible as well as carry a passenger along for the ride if need be. This was tricky. I would absolutely need to remove the back seats, so finding a way to keep the front passenger seat in while still accommodating the bed was the only solution. I wasn't sure what to do at first. I didn't freak out though, just pressed forward and made sure to design it with that solution in mind for later.
The first step was physically the easiest, but maybe the most complicated: writing out all the other steps! I knew having a plan would be necessary here, and I didn't want to go step-by-step without keeping the others in mind. So writing everything down first was number one. After that, I just had to go outside, take the seats out, and measure a bunch of stuff - ceiling height, length, width, and more specifically, length and width at the wheel wells. The wheel wells on my car just inward, so they'd be in the way, and thus I had to make sure to plan my build around them.
As soon as I got all my measurements written down, I went back inside (it was cold). Then it was drawing a bunch of pictures, trying out how different builds would work on the page of my notebook rather than having to build them all separately. I tried out a few different variations. In from the wheel wells, over them, around them, with holes so they could poke out. The roomiest, simplest option was to build the bed over them, so I settled on it. I'd be sacrificing a lot of headroom, but that was OK. I wasn't building this to live in it; just sleep in it. I preferred the room underneath the bed for storage rather than on top of it for hanging out purposes.
The cool thing about a project like this is that once you get started on it, the momentum makes it even more fun to keep going. After designing everything in my notebook, making a materials list, and figuring out how much it would all cost, I couldn't wait to get to the hardware store to get everything and get started. I had given myself a whole week before I wanted to buy things, but I ended up going a few days later. It was fun and exciting to walk the aisles of the store, pick things out, and start to see my notes come to life. I got all my wood cut at the hardware store, so I only needed a handful of tools myself to do the build.
I was able to borrow a drill from a friend and used the project as an opportunity to add to my tool collection with a handsaw and a speed square. I always feel self-conscious about not having enough tools, so whenever I work on a project, I take it as an excuse to add to that collection. The more projects I do, the more tools I'll collect!
The Build
I cannot stress how simple this build was. There are infinite ways to make this project more complicated, resulting in a more fun and exciting end project. That's a great way to go about something like this! Have fun with it and get creative. For my purposes (and budget), I kept it pretty simple but still got exactly what I was looking for.
This past Spring, I lived and worked on a farm and was lucky enough to work closely with an old friend of mine - a carpenter with 20+ years of experience. Working with him for just a few months gave me all the skills I needed to design and build a really sturdy frame.
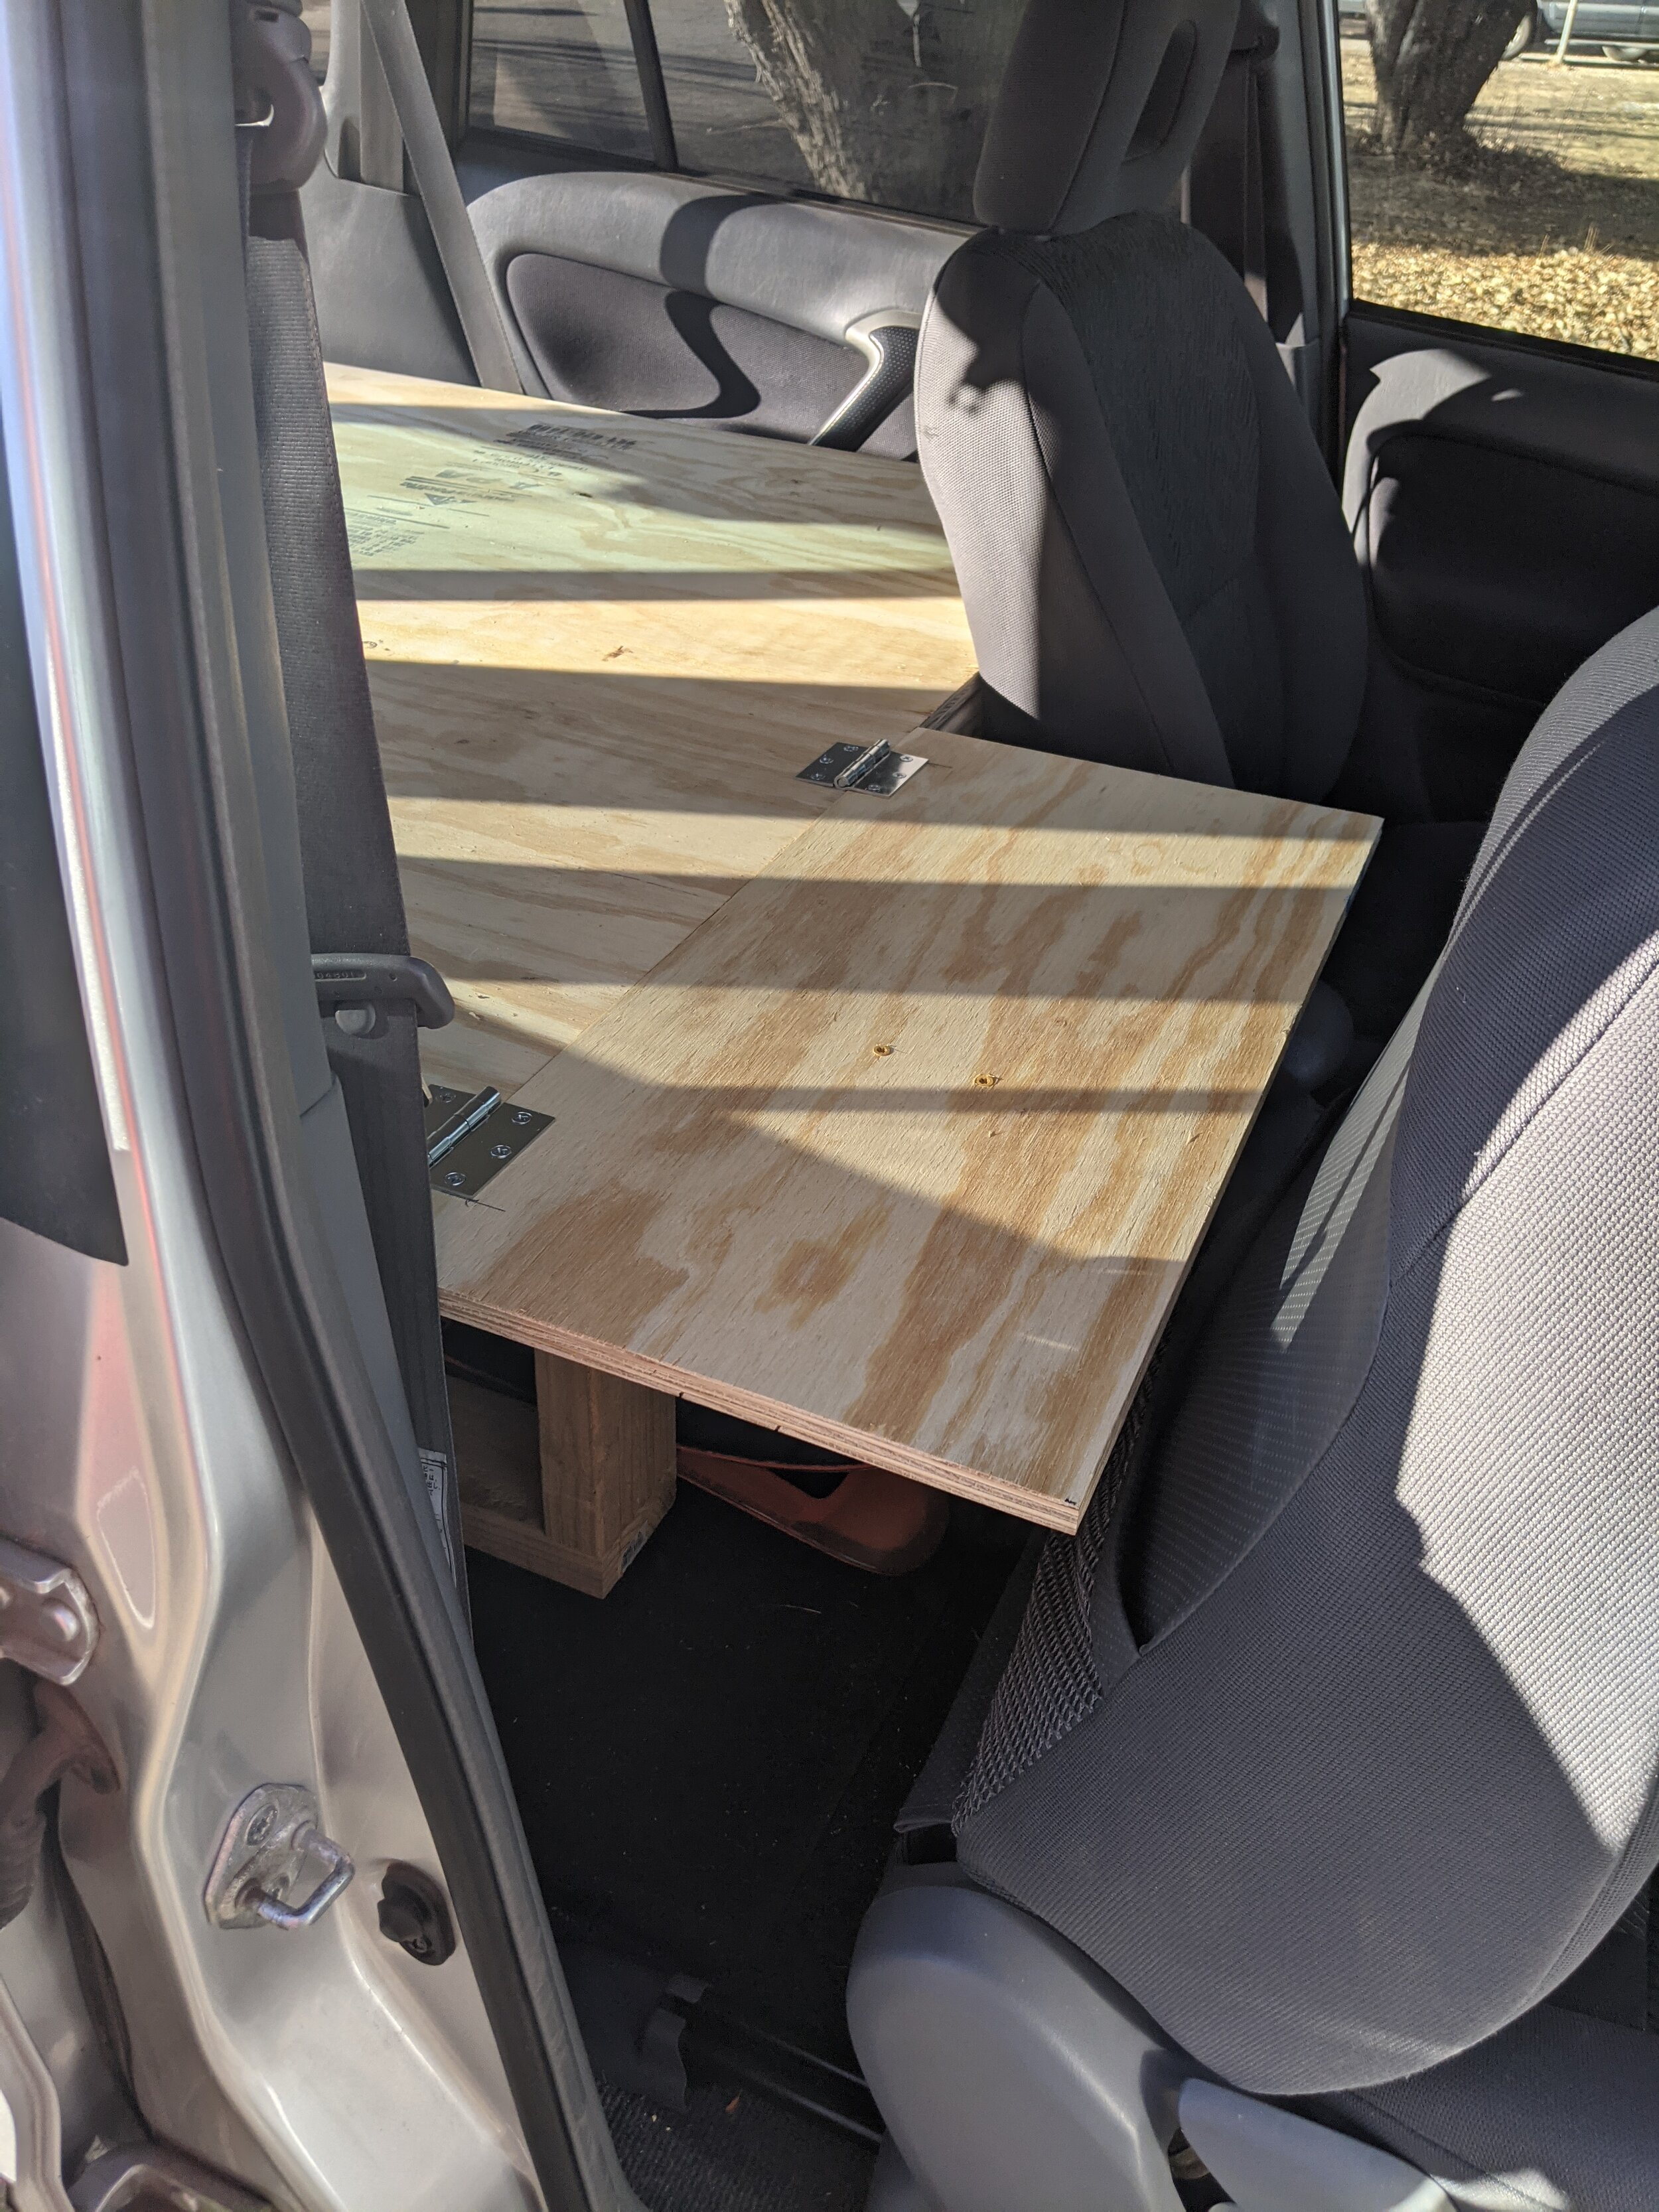
I created three separate framing pieces. Each of them had a top and bottom two-by-four, 58" long (the working length I had). I connected each top and bottom with three 12" two-by-fours, spaced evenly across the length. This made the total height of my frame 16" - just enough to get the top piece of plywood over the wheel wells. I connected all my pieces with two, 2, and ¼" screws, with wood glue to reinforce the connections. I laid out each frame piece across my vehicle's floor and slid my pre-cut plywood on top. It fit perfectly!

Testing out the initial frames - I found I would need some sort of extension…
The three frame pieces were all quite sturdy on their own but needed to be reinforced against one another. After measuring the distance that would be between all three, I went back to the hardware store and got a few more pieces of two-by-four cut to length. About an hour, the rest of my wood glue and some screws later, I had connected the three frames into one big, sturdy bed frame. The plywood slid right on again, and I had my bed!

Final, fully connected, single frame piece…

…now in the vehicle with plywood on top (note how convenient my ski storage is!)
I could have been done there, but I had one more little tweak to add to really make the most out of my small space. You'll recall the bed I build was only 58" long - not even five feet! I am 5'7", so I would be able to sleep on the diagonal, but it still felt a little cramped. I wanted to make my platform longer. How could I do this?
Well, I definitely wanted to keep the passenger seat in. So I wouldn't be removing it to extend. However, the seat did fold forward and slide up quite a bit. About an extra 12" to be exact. My last step was to take some of the leftover plywood I had back to the hardware store and get it cut to a one-foot by two-foot section. I then attached this section to my existing plywood on hinges, making it simple to fold down and back, allowing the seat to be folded up and forward or back, and accommodating to a potential passenger. I used my handsaw to cut a piece of two-by-four at a 45-degree angle on both ends and then connected it to the extension piece's bottom. This allowed the two-by-four to naturally rest against a piece of the frame when the extension was down, providing more than enough support.
Extension piece, with seat folded up and forward

Bottom of the extension piece, the support I put on is visible when it’s folded back
That was that; my build was done!
Some Final Additions
I didn't have a camping trip planned for two whole weeks after the build was finished. Although I was impatient to test out my setup, it gave me enough time to finish it up by setting up the bed for sleeping and procuring a few other items that could be hand in my new setup.
This was actually a good excuse to get some new pillows and blankets for my bed, on which I was sleeping on some pretty old ones. I went to Target and got two new pillows and a big, fluffy blanket, then took the old ones off my bed and put them in the car. Even on old pillows and blankets, I'd still be sleeping infinitely more comfortable than in a tent! For the mattress, I decided on a two-inch memory foam mattress topper. I probably would have preferred 4-6 inches, but I only had about 20 inches of space between the bed platform and the ceiling. Every inch I could save would count.

The final bed - blankets and all!
When I finally took it out camping, it worked great. The mattress was surprisingly comfy. Sleeping inside the vehicle kept me warm on a cold, windy, desert night, and the bed had more than enough room. I am so happy to be able to camp almost anywhere now!
What a fun project this was! It felt great to finally find the time and motivation to do something I had wanted to do for a while. When I took it out for that first camping trip, I couldn't have been happier with my new setup. Any project that makes my ability to get outside, adventure, explore, camp, and relax easier is well worth the effort!